Monday, January 30, 2012

Patio update #3

So here we are about a week later and the patio is about 90% done! Very exciting. Just as a run down this is what has been completed:
  1. demo of old patio/ sidewalk
  2. set forms/ pour/ stamp the pigmented patio
  3. set forms/ pour the concrete for the sidewalk and side of house area
  4. pour concrete pad site for our storage shed in back of the yard
  5. replace & paint shingles on front of house
  6. replace shingles in back of the house
  7. Build said shed (more to come on that later)
Now all we have to do is finish priming/ painting all the shingles, get the grill re-installed to the gas line (after we decide exactly where it's going), put in the crushed granite around the gas meter and place patio furniture! Then in about 2 weeks they will come back to do a final seal of all the concrete!

That was a lot of work for one week! Here's where we are now:
pardon the debris- this was after a day of monsooning!

possible spot for the grill

cute little feet on the pergola and you can see the edge of where we'll be putting some crushed granite- we chose not to put concrete around the gas meter in case we ever needed access to it.

Where we need to finish painting- notice anything missing???

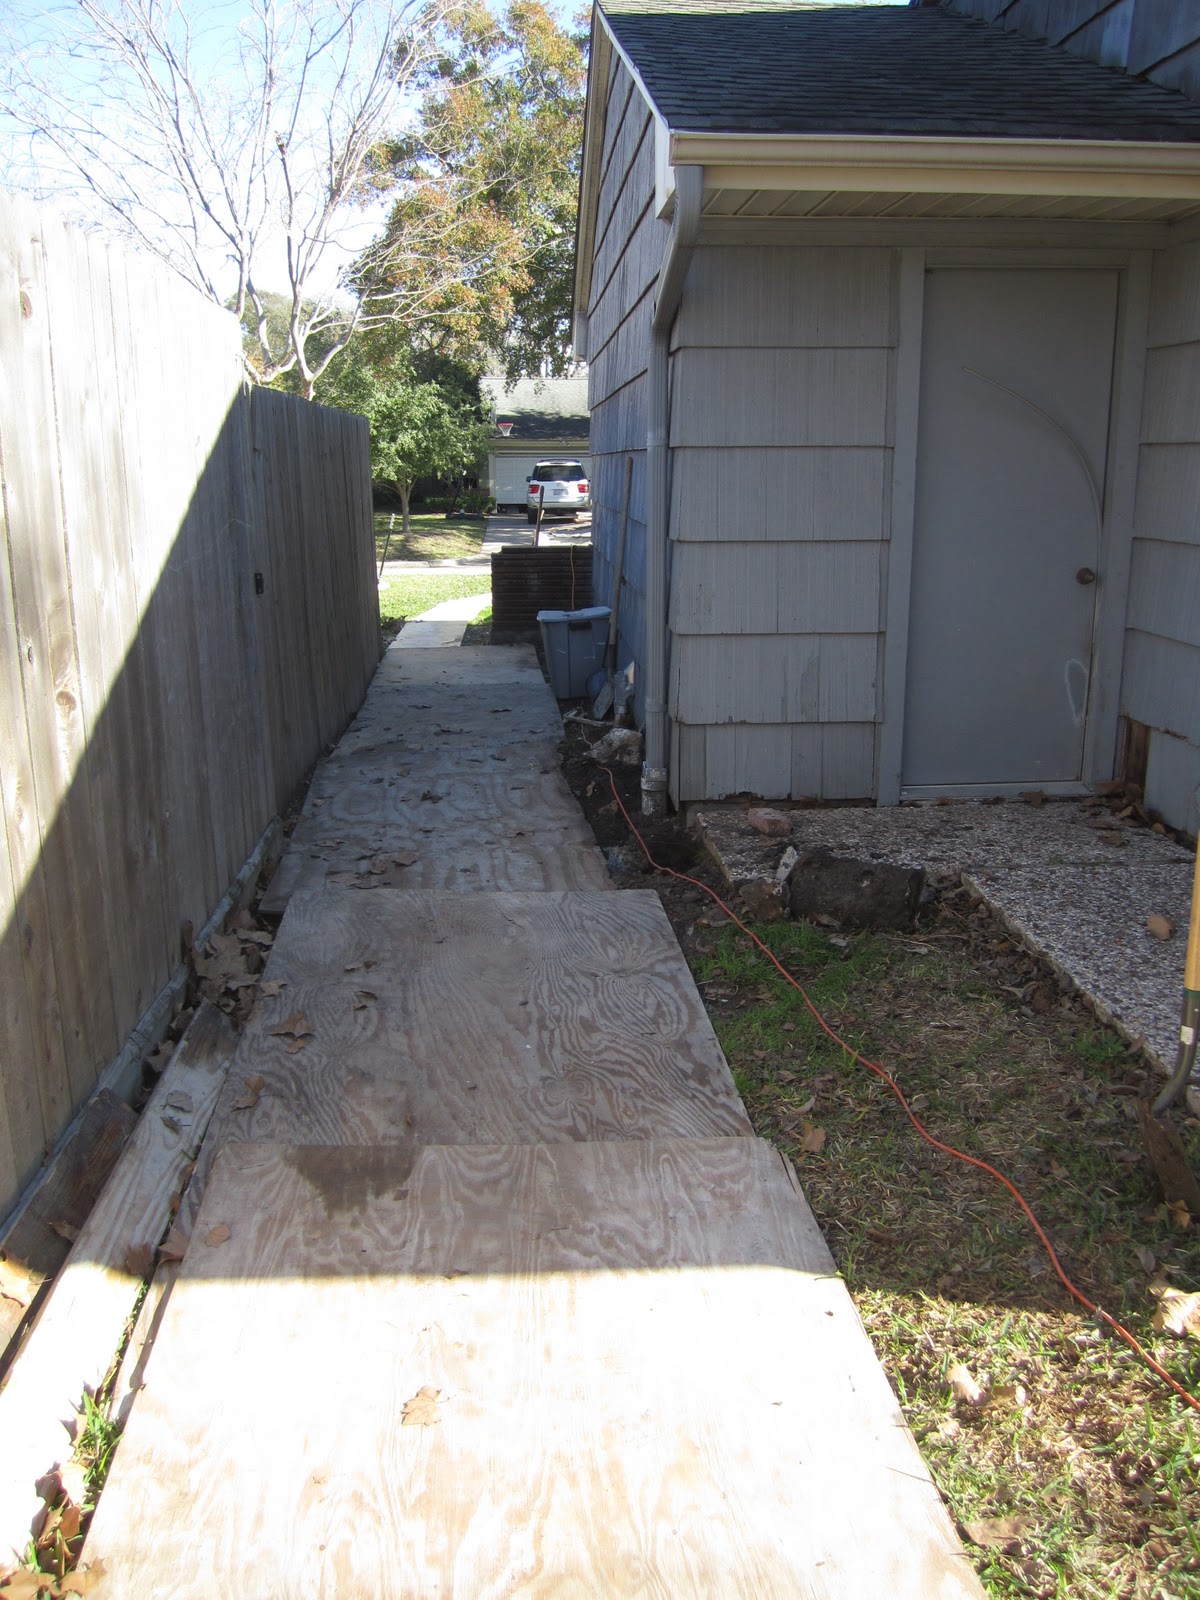
walkway from backyard gate to the driveway- this little area on the left will also be getting some crushed granite

and the new sidewalk- with no step! YAY

I'll be back soon with final pics!

Friday, January 27, 2012

patio update #2

The patio is poured and in the process of being stamped and it's looking awesome! I'm just going to let the pictures do the talking:
Forms in place


Concrete truck is ready!

And we pour!


starting the stamping process


Needless to say it was one LONG day of full of concrete! But it's amazing what a few tons of concrete can do for your backyard!


Wednesday, January 25, 2012

tweaks

So, in my long absence from blogging over the holidays I think I forgot to show everyone some of my gifts from Santa and the re-arranging that followed. Mainly, we got a new cabinet for our entry "hall" (really just a wall!) See the transformation below

First, here is out entry BEFORE:

And AFTER with the new console:

this is when it was still decorated for Christmas

This was one of my big gifts this year was very exciting for me. It's something I've been stalking on Home Decorator's Collection for a while, so I was pumped to find it on sale and with free shipping! Oh I mean Santa was pumped. It was actually even delivered before Christmas which allowed me to get it put together and decorate while I was off from work! And then re-arrange my whole house afterwards! P was so excited. . . but not really!

First off- this allowed me to get our DVDs out of sight- we were feeling a little like college kids with our DVDs on display
see them there over on the right hand side?

Then it allowed me to move our old entry table into the guest room. So we could move the very short and narrow table off this long wall.
BEFORE:

AFTER:

And I went ahead and updated the paper in the frame- I never really liked the way the flowers looked even though I do like the paper

something a little more sophisticated

for an overall effect:

Then I could use the DVD rack for my cookbooks and Sam's toys/ treats, etc in the kitchen
BEFORE:
*Sam's treats, etc sat on our bar which was always annoying

AFTER:

We are really loving all of the changes! Even if it took a whole Saturday to figure them all out!! 

Monday, January 23, 2012

I heart my closet

So after a Sunday afternoon building the closet, everything is complete and all clothes plus a few more items have been easily arranged into my new and improved closet! I love that the Elfa can make such a huge difference in the carrying capacity of the closet without having to remove a wall or change anything structurally

Enough with the words, check her out!
upper rack and shelves


left side- with shoe racks :)

gliding shoe racks :)

right side


up high!

I really even amazed myself at how much I could fit into my closet now! No more searching the hall closet for cocktail dresses or switching out my summer and winter clothes!

Friday, January 20, 2012

Closet makeover

So while we (or a team of trained patio professionals really) hammer away on the patio, P and I have been hard at work inside the house!  Here's a peak at that work

Yeah, that's a LOT of concrete! Please notice that while they are still putting the huge pieces of old patio into the bed of the truck there is a guy pumping up the tires of their trailer! Don't worry they made it back. . . and we were still working away

Last year around this time we gave Patrick a lot more closet space by taking down the single rod/ shelf and replacing with some Elfa products from the Container Store. While his closet is still small and awkwardly shaped it has provided him so much more space to hang his clothes and the shelves give him spots for his shoes and workout clothes that he never had before! SO. . . I decided I wanted to "elfa" my closet too! Actually I've wanted to for quite some time but we had a lot of other projects to accomplish first. I waited patiently (depending on who you ask!!) and now is MY turn!

We picked up the gear from our local Container Store last weekend, they loaded into my car for me- so nice- and we got to work! I'll spare you the details of putting it up mainly because I went into detail when we installed Patrick's closet and just because it's so easy

Here is the before-(kind of- forgot to take one before I took all my clothes out. . . or the rod!) JEEZ I'm a bad blogger, but you can still see where the rod went and the one shelf. it's a decent size closet but with just one rod and one shelf behind my sliding doors.


Here is the plan
GSR stands for Gliding shoe rack :) Be jealous!

and a pretty sketch of what it will look like in person
The far right side is another small rod for hanging long maxi dresses and old bridesmaids dresses! And there is enough space above to hold my small suitcase! And see those shoe racks?? They glide- doesn't that sound nicer than slide- LOVE it. I've got one for heels- that holds 9 pairs and three for flats that hold 6 pairs each!! I'm in shoe heaven. And look at all the extra shelves to hold purses, sheets, extra towels, etc!

I'll be back with a final "AFTER" pic soon! As for now- this is what my bedroom looks like!
yikes


just keeping it real- things aren't always pretty around here!

Wednesday, January 18, 2012

Patio update

Since this is an ongoing project, I thought it might be kind of fun to blog about it in real time, so there may be a few extra posts here and there to keep you updated!
First off, let me catch you up! Our crew showed up bright and early Saturday morning and got to work. FAST. First thing to go? The fence with the gate so they could get by easier!
While we are looking at this- can we discuss WHO paints a door and trim the same color as the shingles- it drives me nuts for some reason!

Then they were all business- ripping up patio and digging out the earth for the new patio

is it sad that what I notice in this picture is the backs of my cute Dwell Studio for Target pillows in the breakfast room! HAHA


They cleared everything out of the backyard. . . .
and into the front!


YIKES! PLEASE notice the guy airing up the tires on the trailer after they put the whole patio in there!

Feeling a little bad for our neighbors at this point. Call me crazy but I didn't really grasp how big of an operation this was going to be!


And this is how we ended our nice little Saturday!

Then they were back on Tuesday to start work on the pergola and the shingles

This is what I came home to yesterday afternoon! And that's only half of it. There are two more holes waiting to be filled to finish off the base of the pergola


Look how deep those suckers are!


Then they finished installing the shingles on the front and will come back to finish the others!
We're making progress people!!! More to come from our updates this week soon!

Monday, January 16, 2012

Patio project

So as i casually mentioned on Friday, I kind of knew from the beginning I wanted stamped concrete (Clear from all my inspiration pics.) While I love the idea of a natural stone like slate I worry about all of the upkeep and durability, and I didn't want a ton of grout lines between the stones. Oh and it was out of our budget- did I mention that ?? I love the stamped concrete because there is a pattern (which every contractor has a different name for!) that looks very similar to how a slate would be laid. It's pretty and stained dark greys so it looks more like a natural stone but has all the durability of concrete with relatively little upkeep (just a re-seal once a year to keep the colors looking vibrant if you want).

We started off saying we were just redoing the patio but then we had a contractor mention that it would also be nice to have a walkway from the backyard to the driveway (along the area where our trashcans sit) Maybe, just maybe he felt this was important after the two of us slide through the mud to get to the gate the backyard on a particularly soggy day! Of course I too thought it was brilliant so we added that to the plan. Then we realized if we were doing a walkway on the side of the house we might as well go ahead and re-pour our sidewalk to the front door which is all torn up and broken! It just makes sense and is actually cheaper to go ahead and add the extra concrete when the workers and concrete truck will already be here. And lastly we finally decided to replace some of the shingles that are rotting and cracked- mainly just the ones above our picture window on the front of the house, then a few others in the back! WHEW!  This is going to be BIG!

Just for some reference, I took pictures of these areas, for you but mainly for me so I can see the huge transformation this is going to be!
pretty cringe worthy although I didn't do the patio any favors sytling it either! Just don't pay attention to that! Just notice the huge pea gravel sections of conrete that are all uneven and the shingles that have fallen off the side of the house (over in the lefthand corner)

Another view of our long but very narrow patio

not one of these four corners were level with each other!

"flower" bed- that was full of weeds when we moved in. We removed the weeds but never planted anything because it is actually too close to the house to plant any bushes with major roots that could mess up the foundation

broken up front walkway- with a very small step that was a huge tripping hazard. We'll be getting rid of that as well!

And the walkway, or lack there of really, on the far side of the garage with the gate to our backyard. Pretty bad- especially after it's rained.

NOW, here is the artistic rendering one of the companies created for us. It is pretty close to how I envision the backyard will look (minus the trees of course)!

I'll share more patio updates as we get further into the project- which will take about a week to build everything, then they come back a few weeks after they finish and the concrete has cured and they seal the stamped concrete! And in the meantime we've also got some interior projects going on I'll be sharing.
Stay tuned!