Monday, October 31, 2011

Happy Halloween

Happy Halloween friends!
With all the fun holiday inspired subway art on Pintrest recently I've been inspired to make some of my own. They are certainly not the most professional or neatest ones I've seen around but for my first time and working with limited programs, I'm pretty pleased! Love finding all these fun fonts and images!


Feel free to download the image and print. It's a little larger than 8X10 but fits into a frame perfectly!

Thursday, October 27, 2011

HGTV magazine

Have you all seen the new HGTV magazine?


The inaugural issue is out on the stands now and I am super impressed. They had so much information in there, lots of references to blogs and great designers and lots of tips on how to make your house look its best.

They had a section about house hunting and showed pictures of different houses, one whole spread about one couch five ways, showing how you can pump up your couch with just new throw pillows or upholstery
from the cover
another look
both pics from HGTV

The piece going behind the scenes of Sarah Richardson’s farm home is also great and you get to see the house in use. There are SO many useful ideas in just this one article.

Also- for my fellow Houstonians there was an article about bungalow style which featured houses all in the Heights. They talk about what makes a bungalow by definition, different paint color combos that look great and info from the owners about what all they had done to the house.


basic make up of a bungalow

One example
2 pics from HGTV


I was really impressed and super happy I threw this into my cart full of TP, paper towels and frozen chicken breasts as we were checking out at Sam’s last week! Definitely go pick one up for yourself, you won’t regret it!

Tuesday, October 25, 2011

Puppy love

How was your weekend? Well we had a very exciting weekend at our house!! We went to pick up the newest member of our family. After much debate about the name we finally picked one! Drum roll please…………….. please meet SAM! Our new Brittany spaniel puppy! I am so in love with him! He is a sweet little ball of energy and is so funny!

I’m sure we’ll have more pictures soon- lots more knowing me but for now here’s a few to tide you over :


He's about 3 weeks old in these

And this weekend when we picked him up:

He was such a good boy in the car- sleeping most of the way

And even sometimes mid-play- it's a pretty tough life here:


I'll add more pictures soon! Promise!

Thursday, October 20, 2011

Breakfast pizza

When we were in Galveston and stayed at the Tremont House Hotel in July, we had this amazing little creation at the cafe inside the hotel. A breakfast pizza. It was soo good, I just couldn't get over it. Well I was thinking a week or so ago- I could TOTALLY make that. The only thing they did that was "difficult" was the cheese sauce they used instead of a marinara sauce. So I got to thinking how I could do that and DUH I could use a bechamel sauce with cheese- as if I was making macaroni and cheese.

So that's exactly what I did. I adapted The Barefoot Contessa's sauce from her Grown up Mac and Cheese using all cheddar cheese. And after that it was simple. Made the PW pizza crust (but you could easily use a pre-made crust), scrambled some eggs and fried up a few slices of bacon. Then all you have to do is assemble!

What you'll need
Pizza crust
  • 3/4 Cup milk (anything you've got will do)

  • 1 tablespoons butter

  • 1 tablespoons all purpose flour

  • 4 ounces extra-sharp Cheddar, grated

  • 1/8 teaspoon freshly ground black pepper

  • 1/2 teaspoon salt

  • Pinch nutmeg

  • 4-6 eggs, scrambled (depending on how thick you want your egg layer- I used four for a thin layer)

  • 6 slices of bacon, cooked and crumbled


  • Heat the milk in a small saucepan (or just in the microwave) but don't boil it. In the meantime, melt the butter in a small pot and add the flour. Cook over low heat for 2 minutes, stirring with a whisk. It will bubble up and combine to a paste. While whisking, add the hot milk and cook for a minute or 2 more whisking the whole time until thickened and smooth. Off the heat, add the Cheddar, salt, pepper, and nutmeg. Let cool.

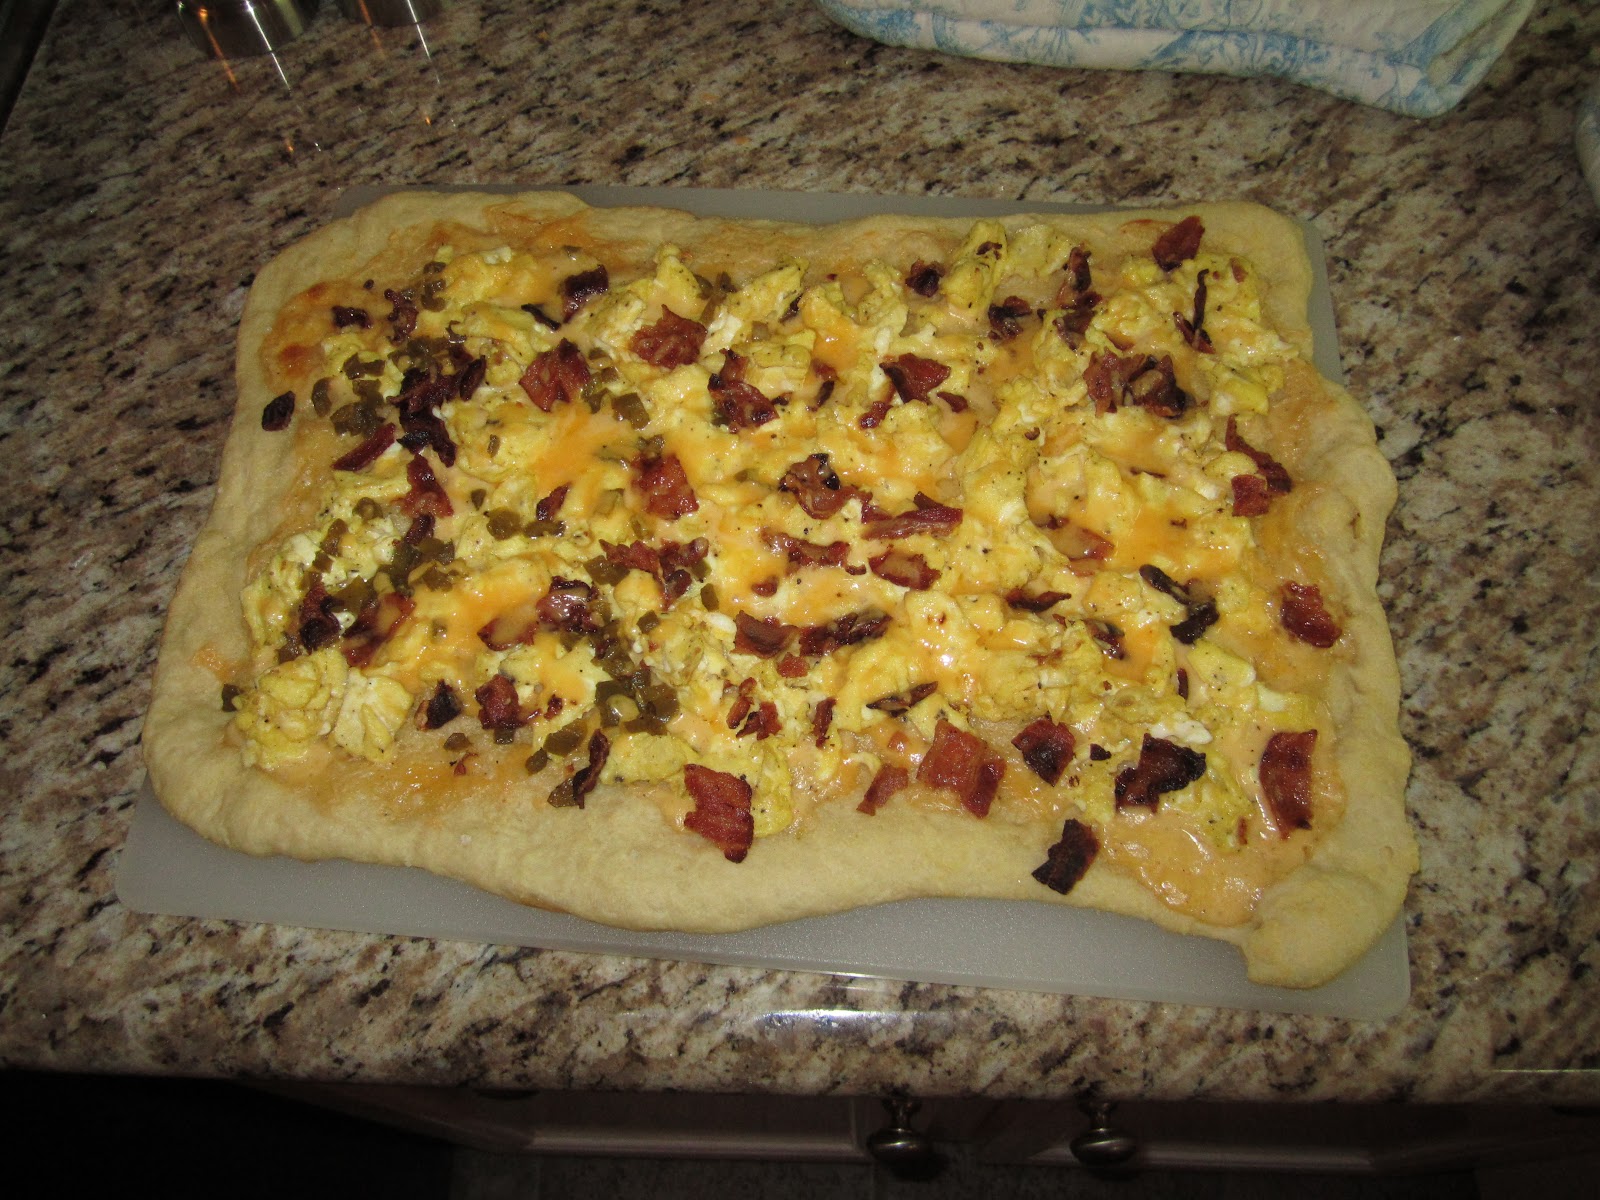
    Preheat the oven to 425. Once the sauce has cooled down, roll out your dough and place on a baking sheet. If using a homemade crust I rub a little olive oil over the crust and sprinkle with salt. Pre-bake the pizza crust for about 10 minutes, until starting to bubble and brown on the top. Take the crust out and spread the bechamel sauce over the crust as you would pizza sauce. Then just layer on your goods! Eggs, then bacon crumbles and a little more shredded cheese. We also used some pickled jalapenos. You can add any other topping you like- kind of like an omelet! Then put it back in the oven and back for 8-10 more minutes, until the cheese has melted!
    Slice it up and voila!
    Super easy and really pretty fast- you could even have all the components cooked in advance and then throw them on there really fast and bake! And trust me- I have NO fancy pizza equipment and it's still so easy to throw a homemade crust together (even if its not round- it's still delicious!)

    Tuesday, October 18, 2011

    Gallery wall- final for now

    I realized the other day that its been a LONG time since I even mentioned the gallery wall. . .like since the beginning of march!! that’s over 6 months ago! CRAZY. And going back and looking at it:

    I laugh. YIKES! Thanks for not laughing at me back when I posted that. I kind of cringe looking at how unfinished it looks. Not that I am a gallery wall expert by any means, I will be the first to admit I know NOTHING about design stuff, I'm just picking it up as I go/ do! I still always feel like it could use something else or in a different spot, BUT I am much happier with the current showing than ever before.

    No more half empty walls and lopsided arrangements. Here’s my final (for now) product.

    It’s probably been this way since about the beginning of August and it’s the first time I haven’t looked at it every night and wanted to change it- so that’s a good start!

    Thursday, October 13, 2011

    Outdoor lighting

    As we were looking for new doors I decided that I wanted to needed to replace the outdoor lighting as well. Our current lights are literally the absolute cheapest outdoor light fixture you can buy at Lowe’s (trust me, we did a little research!) So I started looking for something we could hang both by the front door and by the garage doors. Doesn’t sound tricky but we have some measurement issues/ height restrictions which made it hard to find something big enough that wasn’t too tall. Cue Lighting Direct for a bevy of beautiful options (including our choice)
                                  
    Which is perfect because the bulk of the light fixture is below the base piece so the height wasn’t even an issue! Thanks mom and dad! What a GREAT birthday present. You’re the best! Yes, I got these two months ago, and YES I feel like a dumb dumb for just now getting them installed. . . well, a month and a half later if we are counting to when they were actually installed!

    And more of a big picture/ full view shot:

    And by the garage:
    Checkout the before shot:
    You can't even barely see the old fixture it was so small and dinky!
    I think they fit in beautifully with the new wood door! And I’m not sad at all to see those $12 Lowes fixtures go, not one bit!!!

    Tuesday, October 11, 2011

    Front door finale

    As typically happens around here, the door stain/ install was a bit of a process but it is DONE (two weeks later) and looking WONDERFUL!! Check out the difference a little wood can make!

    I am so pleased with the finished product it’s not even worth discussing all the mishaps it took to get here . . . at least not in detail. Let’s just admire

    We decided because the wood was so pretty to stain the door on the inside as well, instead of just painting it white and I'm SO pleased with the look. It's so warm and inviting (as is being able to see out the windows)

    No big picture shots just yet- don't want to ruin the next surprise!

    Thursday, October 6, 2011

    Bedside table

    Another project I’ve been thinking about/ on the lookout for for a LONG time now is my bedside table. The one I’ve been using is great but it just looks so dinky and tiny next to our king size bed taking up only about HALF of the space it could. But I’m cheap and didn’t want to spend a ton of money nor did I want something out of the box, I was looking for something a little more special. After months of searching craigslist, antique stores, goodwill and on and on, I finally found my winner. For $30 this little gem was mine:


    Solid wood Drexel chest of drawers from the 1950’s. YAY! Super pumped at this moment that I went out and bought what I thought was the right color, sanded that baby down and painted a drawer . . . only to decide it was too blue and not grey enough! So a few more samples later I landed on Gauntlet grey by Sherwin Williams. Grey with hints of blue and a little smigde of green. Perfect! I was so excited that I literally went home on my lunch break every day of the week to finish the sucker. Thank goodness I live close! Sanded down, two coats of paint, two coats of poly and a little oil rubbed bronze spray paint on the hardward done by Thursday so that it could dry and be in use before the weekend even started! SAWEEET!


    So the best part of this is that now I’ve got a bigger bedside table space to put stuff on and my folded clothes (all but my t-shirts) right next to the bed on my side for when I roll out of bed. AND that has freed up space in the big chest so P can use those drawers so we can get the white shelving unit out of his closet and he can have his lower rack of the closet back to actually HANG things! AMAZING!
    So here is the chest in all her glory:

    no making fun of my p'jammer alarm clock from about..... 1986. It's the best thing ever and it's still going!


    And my old bedside table in the guest room:

    And the old guestroom bedside table (really just a bookshelf) now in the office being a bookshelf!

    OH and the old shelving unit from P’s closet in the garage providing some much needed storage there!

    YAY for the circle of furniture life!

    Monday, October 3, 2011

    Master paint color

    Well, as I alluded to in my previous post, we have FINALLY painted the master bedroom. It’s something I’ve wanted to do since we moved in. And it’s something I’ve planned on doing since about February. No real reason for the wait other than trying to make a decision. Blues can be so tricky. The current blue sometimes doesn’t look so bad online but it was very “baby boy blue” in real life, you know? So I was hesitant to slap up the first color I found. I realize it’s just paint but sometimes, having to paint over a freshly painted wall is not all that fun so I wanted to get the color JUST right, you know?

    I decided on the color, probably around the end of march after staring at my paint swatches for months

    SW6232 Misty

    SW Misty (the top right one in the above pic)

    Only to decide the room was too big and there was just too much furniture to move and I wanted to hire someone to do it. It took some time to find the right person who didn’t want to charge an arm and a leg, but we did and it’s done and I’m so pleased. . . .


    Its kind of hard to see the difference up close

    but when you look at an old pic it is noticeable for sure!

    Oh and now I want to paint the master bathroom too!
    Something darker grey/ blue to contrast more with the white wainscoting! Sorry P J