Monday, February 28, 2011

Lights Galore

Alright folks I ordered lights…. Lots and lots of lights! GET EXCITED! So I made a command decision after talking to multiple people, and after deciding that the really expensive lights, as seen here:

Might be a little too modern for our house- even though I am hands down in love with them- I’m not sure they would fit in with anything else. So I opted for the Golden Lighting Cerchi series.
I am doing the flush mount in the kitchen

And the semi flush mount in the breakfast room:

Then, to pat myself on the back for all that money I saved myself I went ahead and bought lights for the entry hall and office!! WOO HOO! Amazingly, buying all four of these lights, I still spent less than if I had bought the two 2Thousand degrees lights. THAT made me feel good. So now we wait for them to get here so P can learn how to install them without electrocuting ourselves!!!

OH wait you want to see the other lights. Why of course!

So I had three options for the entry hall, remember? I was leaning towards the casualness of the lantern light so I was really thinking that was THE ONE, you know. But then I got my trusty Ballard Designs catalog in the mail on Friday, just in time for my drive to Dallas Saturday morning and low and behold look what I found:


Look at how similar it looks to the original


AND it is actually a better match- color wise to what is in this area already AND it was $50 cheaper! SOLD!

Then I went ahead and ordered a light I had seen a while ago for the office. I wasn’t necessarily planning on buying it- but it’s the only other light in the house I don’t like (currently an old/ low fan with a light fixture on it)* and it had so many positive reviews on Overstock so I figured what the heck, let’s just do them all! So we did and now this is on its way as well:
 metal leaf hanging lamp from Overstock

Really love the uniqueness of it and it will provide a lot more light for the office than our fan light! The outside is metal but the inside drum is linen which softens the light perfectly- according to the reviews. Can’t wait to install them ALL- well really for P to install them all J

*EHH, not exactly true- we have the same low/ old fan in our bedroom but I already have a plan for that and no light fixtures were needed. Later this fall we will put in recessed lights in the master and then put up a low profile fan that we already have from our apartment

Friday, February 25, 2011

Oscar's party appetizer ideas

I have compiled some delicious appetizer recipes from other blogs I read that would be a great addition to any Oscars party you are throwing or going to!

I made the pizza dip for the Super Bowl and it was gone so fast I didn’t even get to take a picture of it! It’s so good and you can really use any toppings you like- we only had turkey pepperoni so that’s all I put on the top and it was still delicious. On crusty French bread or even some hearty crackers- it’s wonderful

Direct from My Baking Addiction: Pizza Dip
Ingredients
8 ounces cream cheese, softened
1/4 teaspoon garlic powder
½ teaspoon dried oregano
½ teaspoon dried parsley
¼ teaspoon dried basil
1 cup shredded mozzarella cheese
1 cup Parmesan cheese
1 cup pizza sauce
1/4 cup chopped green bell pepper
1/4 cup chopped onion
2 ounces sliced pepperoni
2 tablespoons sliced black olives, sliced

Directions
1. Preheat oven to 350 degrees F. In a medium bowl, combine cream cheese, garlic powder, dried oregano, parsley and basil.
2. Spread cream cheese mixture into a 9-inch pie pan, and sprinkle ½ cup of mozzarella and ½ cup of Parmesan on the cream cheese mixture.
3. Top with the pizza sauce and sprinkle the remaining cheeses over the pizza sauce.
4. Top with bell pepper, onion, pepperoni and black olives.
5. Bake in preheated oven 20 minutes or until cheese is fully melted and bubbly.
Notes:
-If you are short on time, you can cover your microwave safe dish and place into the microwave for 5 minutes or until cheese is melted and heated through.


These other two I have yet to make but only because I haven’t had the opportunity- they both look amazing!
Jalapeno popper dip (also from My Baking Addiction)

Ingredients
2 (8 ounce) packages cream cheese, softened
1 cup mayonnaise
1 (4 ounce) can chopped green chilies, drained
4 ounces can diced jalapeno peppers, drained
1/2 cup shredded Mexican style cheese
1/2 cup shredded mozzarella cheese

1 cup Panko bread crumbs
1/2 cup freshly grated Parmesan cheese

Method
1. Preheat oven to 350 degrees and spray an oven safe serving dish with non-stick cooking spray.
2. Using an electric mixer, blend the cream cheese and mayonnaise until smooth.
3. Stir in green chilies, jalapeno peppers, and Mexican and mozzarella cheeses. Spoon this mixture into the prepared baking dish.
4. Mix together the Panko and Parmesan cheese and sprinkle it over the cream cheese mixture.
5. Spray the Panko and Parmesan with a quick spray of non-stick cooking spray.
6. Bake for 25-30 minutes or until the mixture is hot and the topping is lightly browned.

Notes: If you are in a hurry, skip the Panko/Parmesan topping and simply microwave the cream cheese mixture until hot and bubbly.

Serve this dip with, French bread, fresh vegetables, tortilla chips, crackers…pretty much anything that pairs well with cheese!

 LAST ONE!!


1 French baguette, sliced 1/2 inch thick
Brie cheese, thinly sliced, rind removed
2 pears, halved, cored, and thinly sliced
Honey
Fresh rosemary, finely chopped

1. Preheat the oven to 400 degrees. Place the baguette slices on a large baking sheet. Place one slice of cheese on each baguette slice. Bake slices in the oven for 5-7 minutes or until the brie is melted.

2. While the baguette slices are baking, brush the pear slices with honey and grill on each side until soft.

3. Place a slice of pear on top of each cheesy baguette slice. Drizzle with honey and garnish with fresh rosemary.

Wednesday, February 23, 2011

A blank waste turned into a designer space (haha- kind of)

Have you ever been watching TV and been annoyed at the wall behind it? I realize- that's a really strange comment, but it is actually really hard to hang something behind a flat screen TV. Nothing ever looks right. This particular one is not mounted on the wall (like the other two TVs in our household) but it still creates this odd shaped space behind itself that looks equally awkward with or without a single piece of art above it.

This is where the gallery wall comes in- oohh, ahhh:

photo from http://www.emilyaclark.blogspot.com/ (I'm also really liking that rug!)


Anyways- I saw a TON of gallery walls on different blogs that I read often- can't even remember where all-and then I saw this one:


 and it gave me a little hope that maybe I TOO could put one together behind my TV with this picture as my guide. Before I entered blogland I wouldn't have ever even attempted this feat.

YES! Super excited at this point- but also a little scary and intimidating for an A type like me- I always want things to line up perfectly, so finding a layout that is both random but meaningful looking was a big challenge.

Off the bat I decided that I wanted to keep both the frames and the artwork pretty much black and white. I felt like this would make everything a little more of a group than a bunch of random things. Then, I started trying to come up with different things to put in all my frames. I knew I didn't have a beachy theme or anything like that so I didn't want to flat out copy the inspiration picture, but try to find things that make it our own.

So I pulled a couple things from around the house including the picture of the beach chairs here at the top, my wedding portrait in the middle and an old picture of P making cookies at his grandmother's house when he is about 5 (AWWW so cute right?)
It was supposed to be in black and white too but I forgot to tell the man at Walgreen's I wanted it B/W so for right now it's in color, as is the childhood picture of me. I am going to leave it like this and see if it bothers me. You can see that this isn't on the wall at this point either, I started laying everything out on the guest bed- this helped me figure out how things would look on the wall.
Then I added more:
This is a picture from our 1 year anniversary trip to San Fran and our wedding invitation that I took to Kinko's and made a copy at 250% just for a more graphic feel.

Here was my final layout before I started hanging it on the wall-this was after several changes over about a week. I would wander into the room and just stare at it and play around with the layout until it was just right! 
 You can see my childhood picture up top- the color may not bother me, but it is a little dark- I might have to have it lightened up. I was also still missing my Dwell Studio Gate fabric in Brindle for the long black frame


and my precious vintage dictionary page art with the Eiffel Tower painted on that I purchased from Winterberry Cottage on Etsy

 (I LOVE Paris and all things French so it was perfectly fitting). The second they came in the mail I was nailing stuff into the wall. Probably not the best idea- i would measure more first looking back, and THEN nail. But needless to say I got everything up last Friday. And I like it:

BUT... that being said- I think it's going to be changing a little. First off, you can see the poor little M didn't make the cut- he's still sitting in the chair. Also I realize the tallest black frame (with my childhood picture) is too high up, and the one just to the left is really a little low! I am going to be fixing that, and hope to add Mr. M back into the mix, probably on the right side somewhere.

Also- did you notice my other switcheroo?!?

I exchanged the wedding portrait and the Golden Gate photo- I didn't think the small square frame was good enough for my wedding portrait! HA. No not so much that but it's square and the portrait really is not and I loved seeing the arch of the church doors behind me in the portrait so I switched them and I much prefer it!
I'm sure you'll be seeing even more changes in the weeks to come but for now this is a vast improvement over the large blank wall!


Monday, February 21, 2011

Turkey pesto meatballs

This recipe comes straight from a blog I've recently starting reading Baked Bree 
photo courtesy of Bree at Baked Bree
Ingredients
2 pounds ground turkey breast (make sure you get breast- you want the white meat only)
1 1/2 cups bread crumbs
1/2 teaspoon salt
1/4 teaspoon fresh ground pepper
1/2 cup pesto sauce
1/3 cup grated Parmesan cheese
2 eggs whites

Mix everything in a bowl and combine well.  Roll mixtures into balls.  I use an OXO cookie scoop to make them all the same size.  I put them on a cooling rack on top of a foil lined cookie sheet sprayed with a little cooking spray.
Bake the meatballs at 375 degrees for about 20-25 minutes. This makes a lot of meatballs. You can save them for another night and prepare them another way- or just eat them out of the fridge! That might have happened more than once at our house ;)
The original way to serve these is to put them into your pasta sauce until its simmering and serve over pasta. We don’t eat that much pasta though we’ve made them a little bigger and had meatball sandwiches. I’ve even made them small and served them as an appetizer with some marinara sauce on the side. These are so good- the flavor is AMAZING, and really pretty good for you in terms of a meatball and they are not greasy like most meatballs.
ENJOY!

Friday, February 18, 2011

Easy Friday project- fabric bulletin board

I have had this bulletin board since college, maybe even before that. It came from Michael’s; I remember buying it so I could put fun pictures up in my dorm room. It started off as your standard 18''x 24'’ plain cork board with the wood frame.
BORING! So in my infinite wisdom, a couple of years after college I used some leftover fabric my mom had from when my dust ruffle was made to jazz up my bulletin board. I stapled the fabric all around the edges and then I just hot glued some grosgrain ribbon over the staples all the way around the edge for a cute trim and to hide the staples! Great, right?
Yeah it really was. But then it stayed like that for 10 years and even moved with me like 4 times! Why I didn’t ever decide to re-do it before now I’m not sure! But then I saw a super cute fabric covered board in one of my FAVORITE fabrics just the other day on Honey We're Home and it completely gave me the inspiration I needed to redo my little bulletin board, AND get this- I already had some fun fabric left over from the fabric I bought to frame for my new gallery wall (which you'll here all about next week)
So I went to work carefully cutting my fabric and I was about to start stapling my fabric on, but I stopped. All the frames I have seen on fabric’ed bulletin boards have been white. How cute would this fabric look against a white frame- it would pop so much more right? So I grabbed my bottle of Rustoleum white glossy spray paint and went to work. Two thin coats later I had a cute little white frame.


And the spray that landed on the actual bulletin board doesn’t bother me because I’m never going to use it without fabric on top anyways! Then in an attempt to learn an easier, err faster way to do this little project I ran up to Hobby Lobby to get some spray adhesive to attach the fabric to the board- this way I can skip the ribbon step right? WRONG… the only spray I could find at Hob Lob was temporary AND it was $15 for a tiny bottle. I’m sure I could have found some at Michael’s or another craft store but I am impatient and I wanted to work on this project NOW!  So I opted for my original ribbon method instead. I LOVE IT and this way- I don’t have to be nearly as careful when I cut the fabric because I’ll have ribbon covering up any mistakes! I found this pretty chocolate brown velvet ribbon that was 50% off so it came out to $1.50 a spool
 (I got two just to make sure I had enough) So I’ll just hot glue this around the edges after I staple down my fabric.

shh- don't tell- this is black because i forgot to take a picture of the ribbon and they don't have the brown on the website (but it is actually at the store) photo from Hobby Lobby

Here’s my method for the cute fabric bulletin board- while not the only one- this is just what worked for me
1.Cut fabric to be a little larger than your bulletin board- watch where your pattern will go before you cut so you can put the parts you like best on the front and center area of the board.

2.       Fold the excess fabric under and staple the fabric down just inside the bulletin board frame using a light duty staple gun. Try to make sure the fabric is straight as you go around the outside of your board and pull to make sure that the fabric is taut the whole time you are working so you don’t end up with any fabric pouches in the center.

3.   Get that hot glue gun out and turned on. Then measure and cut ribbon for all 4 sides of the board. When the glue is hot- just run a bead of the glue all the way down the bulletin board just inside the frame. This is to cover up the staples. But really, you can skip this step if you like, the staples are barely visible anyways!

Till you're done:


Wednesday, February 16, 2011

My feet are cold!

RUGS!!
I need them- but I have trouble finding just the right one . . . at just the right price.
I have a rug picked out for our bedroom- I am IN LOVE with it- it’s so pretty I wish I could have it right now! BUT we have chosen to work on the house more than we have to add new furnishings- at least in the past. But I am ready for some rugs in this house, to add some dimension to our room sure, but mainly for WARMTH!! Wood floors in our bedrooms are COLD in the winter- I need something soft and warm to step out of bed on to. Otherwise, I might just not get out!

Here is the bedroom rug I want:

Its from Pottery Barn and I have admired it for years. It is expensive (for our rug budget at least) but I think it will be so worth it to have a nice, thick, plush rug under our feet in the bedroom. And I just love the colors- so soothing and pretty.

I am also looking for a dining room rug. We have a dining room rug- also from Pottery Barn- it’s the diamond jute rug and I really like it, BUT I never thought about how the texture makes it hard to pull your chairs in and out, especially when sitting in them. People who come over get confused and the whole rug gets pulled around or just snagged because it’s so hard to get the chair leg up above the pattern of the rug! So I have decided this rug needs to be a bedroom rug, and I am planning on it going into the guest bedroom once we have a new dining room rug.

I really wanted to do something fun and different and a little more modern with our antique dining table

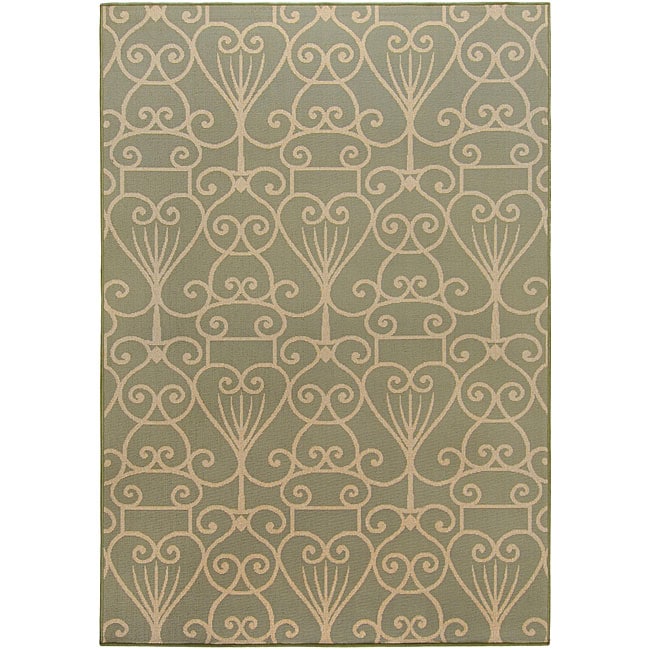
So I’ve been looking at big graphic patterns like these:
all of the above are from overstock.com


And I just found this, via the 7th house on the left blog!
Dwell Studios

LOVE IT! I thought I loved the fabric- then I found the rug!! It was indeed a very exciting day. And again- this rug isn’t cheap but it’s really very well priced for an 8x10 rug that is high quality and made to last. The best part of it though, is that it is a flat weave! It is very flat and easy to move around on! YAY! So now I just have to be patient and save save save so we can order these two rugs this spring! (We are all about updating the house and having everything look perfect but, we also want to do this completely debt free so no changes get made until we have the money in our “House/ DIY” savings account- yes it is actually labeled that!

Monday, February 14, 2011

decisions, decisions

So when we had our wall between the breakfast room and the Wii room taken out (jog your memory here) so that our kitchen, breakfast room and Wii room are all open to each other like this:
We found out  that the Wii room actually has hardwood floors under all that tile AND it is in good condition! WOW!!! This is the only spot in the house (besides the two bathrooms) that are tile, not hardwoods. My immediate reaction is YES rip that tile off (its not my favorite tile anyways and have multiple times thought of replacing it).

But then I start worrying- as I usually do- that it might not look as cohesive or unified as when there is one flooring throughout the area. And, SAD we really can't put wood down in the kitchen- its not recommended in an old house on a slab foundation. AND it would cause the whole area to be higher than the rest of the house due to the way you have to install hardwoods. So the question then became- what would it look like with two different floors? Well my question was answered pretty fast as there is a house on the market in our neighborhood that had just that! An opened up space with wood in the "den" and tile in the breakfast room and kitchen. So here it is:
What do you think? I don't think it's as bad as I was expecting- but they have dark tile and dark wood. We have lighter tile and our wood would be lighter to match the rest of the house.
I don't know- as of now I am undecided- I would love to have the wood exposed but I not at the expense of the room's overall feel. What would you do?

Sunday, February 13, 2011

Easy Chicken Cordon Bleu

I adapted this from delish.com and it was so good! We really loved it and it was also super easy. You could always use regular ham instead of the prosciutto. P doesn't like ham that much so the prosciutto works better for us. Same goes with the cheese- whatever you've got will work! 

Ingredients
·         4 (1 1/4-1 1/2 pounds) boneless, skinless chicken breasts
·         1/2 teaspoon(s) freshly ground pepper, divided
·         1/2 teaspoon(s) salt
·         1/3 cup(s) shredded muenster cheese ( I just got some slices from the deli and chopped them up really small- it was just as easy and 10X cheaper than buying a block of cheese)
·         2 tablespoon(s) reduced-fat cream cheese
·         1/4 cup(s) coarse dry breadcrumbs 1 tablespoon(s) chopped fresh parsley, thyme, or oregano
·         4 teaspoon(s) extra-virgin olive oil, divided
·         4 thin slices of prosciutto  

Directions:
Preheat oven to 400°F.
Sprinkle chicken with ¼ tsp. pepper and salt. Combine cheese and cream cheese in a bowl. Combine the remaining 1/4 tsp. pepper with breadcrumbs, herbs, and 2 teaspoons oil in another bowl.
Heat the remaining 2 teaspoons oil in a large, ovenproof nonstick skillet over medium heat. Cook the chicken until browned on both sides, about 2 minutes per side. Move the chicken to the center so all pieces are touching. Spread with the cheese mixture, lay prosciutto slice over cheese, then top with the breadcrumb mixture.
Bake until the chicken is no longer pink in the center and an instant-read thermometer registers 165°F, 5 to 7 minutes.

Friday, February 11, 2011

Easy Friday project- picture frame white board

So here is a fun and easy project for you that will seriously take MAYBE 10 minutes and it's SO cute and useful, I just love it! I don't know if you are a list person but I am a list fanatic! Ask P over here- I think I drive him crazy with my lists- grocery list, house project lists, trips I want to take list, rooms I want to paint lists, honey do lists, they go on and on.

ANYWAYS back to the point! I ran across this idea in a magazine- I believe it was Better Homes and Gardens but I'm not sure. You need three things
1. picture frame- probably at least 8 x 10 so you have enough room to write your list (They are always on sale at Michael's and Hobby Lobby)
2. scrapbook paper or fabric
3. scissors

All you have to do is cut your paper or fabric to fit inside the frame, pop the frame back together and VOILA!


 Seriously - it is THAT simple. You use the glass of the frame as a whiteboard and its so much cuter than a regular whiteboard that just wouldn't add anything to your decor. I used a vintage looking blue scrapbook paper for now. I love the color and think its wintry- but the best part is that you can change it whenever you want! I always have leftover fabric scraps or papers from different projects. I want to change them out for the holidays too! You can get scrapbook paper from Michael's for 99cents a piece so its a pretty cheap update throughout the year.
I think this would be great in an office or even a kid's room for chores and homework. Ours is in the kitchen and it has everything from to do lists to grocery lists sometimes even our meals for the week so P can pick what night we're having which meals! The possibilities are endless!

Thursday, February 10, 2011

What a bright idea!

So, we've been in our house about six months now, maybe a little more, and every month it really does feel more and more like our own. It is my baby and I'm always working on it. Men don't always understand that- just because I want to change something doesn't necessarily mean its bad right now, I just want to make it better.

Having said that. . . our lighting situation in the kitchen is BAD folks! Drives me crazy. I have what we affectionately call them "boob lights." You know what I'm talking about- the flush mount domes with the little piece on the bottom that makes them look anatomically like a boob.

I'm not a fan, never have been, BUT they don't always look terrible. Some are nicer than others and there IS a place for them- a closet or even a hallway but not in MY kitchen. Especially not with this color shade (which makes my sandy walls look YELLOW at night!) and in the wrong finish- don't get me wrong- I do like the oil rubbed bronze but every knob in the kitchen is brushed nickel and we have stainless appliances so they just look out of place. So I have been doing all sorts of research for the better part of a month (P is so tired of looking at all the lighting links I send him!!) and I have narrowed it down!

What I really LOVE is this:

2 Thousand degrees large Mulberry light (20" round)

But- major reservation- its super duper expensive. I know, I know, lighting is expensive and I certainly don't want anything that looks cheap or is just poor quality BUT its also hard to rationalize so much money when  instead I could get these:
Golden Lighting's Cerchi series flush mount to go in the actual kitchen (got to keep it pretty short so poor P's head doesn't hit it)

And this semi-flush mount in the same series for over the breakfast room table


Then we could put the left over money towards something like this:
 for the entry way (which also has the same boob lighting)

World Imports Rennes Collection Foyer pendant (my current favorite)
But I also like these:


The entry lighting gets a dark finish because our door hardware is oil rubbed bronze- I'm okay mixing the finishes I think this looks good in the front of the house (entry, living, dining room) but like the brushed nickel or chrome in the kitchen. Nothing has to be matchy matchy anymore, right?

Anyways- what do you think? Do you think it' worth it to splurge on the expensive fixtures knowing they are perfect or do you make the compromise and get something a little cheaper that you still really like and allows you to tackle a few more projects? Also what's your favorite of my three entry hall light choices? I go back and forth!

*All light options (minus the last two) are from http://www.lightingdirect.com/ a GREAT source for high quality lighting at a good discount!

Wednesday, February 9, 2011

Well hello there- its been a while old friend!

Oh my! Where to start- it's a little overwhelming to leave your blog for so long. I have so much to talk about and I don't know where to start! It has been a busy busy month for me. My sister is getting married in LESS THAN A MONTH!!! I can't believe it. I am so incredibly excited and needless to say, I had lots of fun things to plan for her in the past couple of weeks.
Anyways- we haven't done anything major to the house in the past month- don't worry you haven't missed out on much BUT I feel like I've been making lots of decisions on things that I DO want- just haven't happened yet!

First though I should tell you this: Do you remember when i was looking for a lamp to go on the chest by the back door/ mudroom (read about it here)? Well patience IS a virtue folks! I found a lamp at Target almost identical to the last Pottery Barn one but for much less $$$. Check it out:

Inspiration picture, courtesy of PB:
stacked crystal bedside table lamp $150!

AND, the lamp I found, and clearly snagged IMEDIATELY at Target:
I don't know the name but this awesomeness cost me a whopping $16!

While its not EXACTLY the same, its exactly what I was looking for and a better price than I ever imagined! And I really like the texture on the lamp shade- it's really really pretty lit up in that room. I'm IN LOVE and so glad I was always keeping my eyes open and looking!
This was a random Target trip for a frame to add to my gallery wall (which I'll tell you more about later) that wound up with me spending more than expected BUT coming back with a HUGE bevy of treasures!

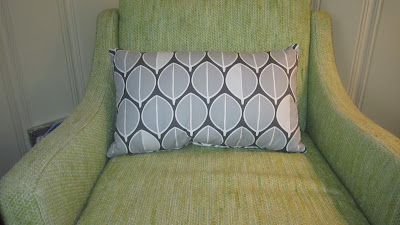
I also picked up these two pillows for $9 a piece on clearance:

Don't they look cute in my vintage green chairs?!? I love them. And they were a great find because I was planning on ordering some of this fabric from fabric.com:

Waverly Cross Section in charcoal

and although the fabric is pretty cheap ($8.98/ yard) having the two pillows made DEFINITELY would have cost me more than $18! I am in love with it though so I may try to find another use for it! 

And I DO realize that these patterns really are nothing alike, but it's the tones and the graphic print that makes me love them- and it helps anchor the room a little bit more- the furniture is all light colored and a hand me downs so I wanted to liven them up and I think the pillows are just the trick!

I also did get two frames to add to my gallery wall, a great little flat weave rug in a fun navy/ white pattern to go in front of the washer and dryer and a basket to hold my aprons in the pantry! WOO HOO for the Targ!